
Using Handlebars Templates in ASP.NET to Send Dynamic Emails
Power up your ASP.NET emails with reusable templates and custom helpers

If you've ever tried formatting dynamic emails in ASP.NET, you know how quickly string concatenation turns into a mess. That’s where Handlebars shines—bringing structure, reusability, and clarity to your HTML email templates.
In this article, you’ll learn how to:
✅ Use Handlebars.Net in an ASP.NET application
✅ Render dynamic HTML email templates
✅ Register and use custom Handlebars helpers for conditional logic and formatting
💼 When Should You Use Handlebars in ASP.NET?
Here are some real-world scenarios where Handlebars is an ideal fit:
✅ User Onboarding – Send personalized welcome emails with user-specific data.
✅ Password Reset – Inject secure reset links into templated emails.
✅ Order Confirmations – Display dynamic order summaries and totals.
✅ Weekly Reports – Generate templated summaries based on time-based data.
✅ Marketing Campaigns – Render branded HTML with user-specific content.
If your app sends any kind of dynamic HTML email, Handlebars is a clean and maintainable solution.
🔧 Why Handlebars.Net?
Logic-less templates – Keeps templates focused on content, not logic.
HTML friendly – Great for emails, reports, and reusable HTML structures.
Powerful extensions – Support for custom helpers, loops, and conditionals.
Separation of concerns – Your rendering logic stays out of your business logic.
🧱 Getting Started: Step-by-Step Setup in ASP.NET
1. ✅ Install the NuGet Package
dotnet add package Handlebars.Net2. 📄 Create Your HTML Email Template
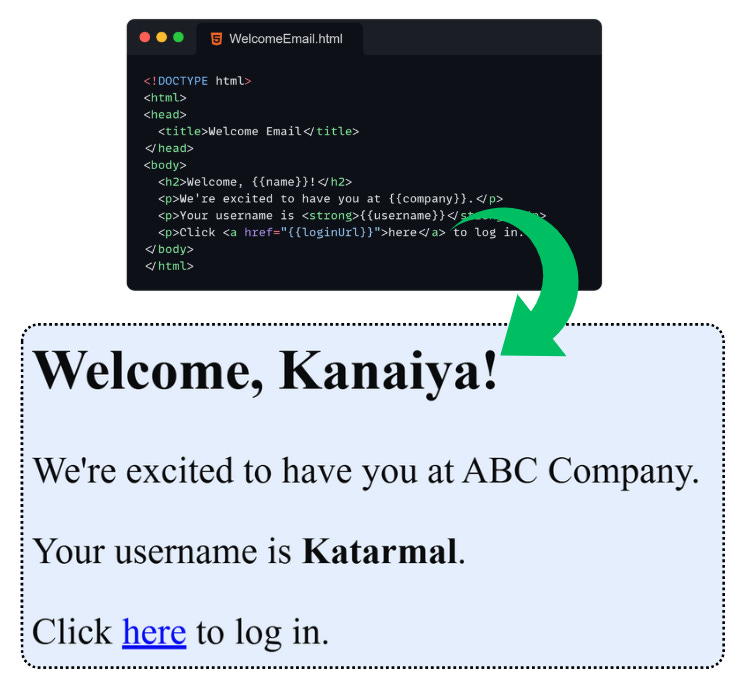
Save this as Templates/WelcomeEmail.html:
<!DOCTYPE html>
<html>
<head>
  <title>Welcome</title>
</head>
<body>
  <h2>Welcome, {{name}}!</h2>
  <p>We're thrilled to have you at {{company}}.</p>
  <p>Your username is <strong>{{username}}</strong>.</p>
  <p>Click <a href="{{loginUrl}}">here</a> to log in.</p>
  <p>Joined on: {{formatDate joinedAt "MMMM dd, yyyy"}}</p>

  {{#ifEquals userRole "admin"}}
    <p><strong>You have full admin access.</strong></p>
  {{else}}
    <p>You have standard user permissions.</p>
  {{/ifEquals}}
</body>
</html>
3. 📦 Define a C# Model
public class WelcomeEmailModel
{
    public string Name { get; set; }
    public string Company { get; set; }
    public string Username { get; set; }
    public string LoginUrl { get; set; }
    public DateTime JoinedAt { get; set; }
    public string UserRole { get; set; }
}
4. 🛠️ Render Template with Handlebars
using HandlebarsDotNet;

public class EmailRenderer
{
    public static string RenderTemplate<T>(string templatePath, T data)
    {
        var source = File.ReadAllText(templatePath);
        var template = Handlebars.Compile(source);
        return template(data);
    }
}
5. 📬 Send the Email
public class EmailService
{
    public void SendWelcomeEmail(WelcomeEmailModel model)
    {
        HandlebarsHelperRegistration.RegisterAll(); // register helpers

        var body = EmailRenderer.RenderTemplate("Templates/WelcomeEmail.html", model);

        var mail = new MailMessage("noreply@yourapp.com", "user@example.com")
        {
            Subject = "Welcome to the App!",
            Body = body,
            IsBodyHtml = true
        };

        using var smtp = new SmtpClient("smtp.yourserver.com")
        {
            Credentials = new NetworkCredential("yourUsername", "yourPassword"),
            EnableSsl = true
        };

        smtp.Send(mail);
    }
}
🔌 Handlebars Custom Helpers in C#
To make your templates even more powerful, let’s add a few custom helpers.
🧠 Helper 1: toUpper
Uppercases a string.
Handlebars.RegisterHelper("toUpper", (writer, context, parameters) =>
{
    if (parameters.Length > 0 && parameters[0] is string input)
    {
        writer.WriteSafeString(input.ToUpperInvariant());
    }
});
Template usage:
<p>Hello, {{toUpper name}}!</p>🧠 Helper 2: ifEquals
Conditional rendering logic.
Handlebars.RegisterHelper("ifEquals", (writer, context, parameters) =>
{
    var val1 = parameters.ElementAtOrDefault(0)?.ToString();
    var val2 = parameters.ElementAtOrDefault(1)?.ToString();
    var options = parameters.ElementAtOrDefault(2) as HelperOptions;

    if (val1 == val2)
        options?.Template(writer, null);
    else
        options?.Inverse(writer, null);
});
Template usage:
{{#ifEquals userRole "admin"}}
  <p>You have admin access.</p>
{{else}}
  <p>Standard access granted.</p>
{{/ifEquals}}
🧠 Helper 3: formatDate
Date formatting helper.
Handlebars.RegisterHelper("formatDate", (writer, context, parameters) =>
{
    if (parameters.Length >= 1 &&
        DateTime.TryParse(parameters[0]?.ToString(), out var date))
    {
        var format = parameters.Length > 1 ? parameters[1]?.ToString() : "dd MMM yyyy";
        writer.WriteSafeString(date.ToString(format));
    }
});
Template usage:
<p>Joined on: {{formatDate joinedAt "MMMM dd, yyyy"}}</p>📦 Register Helpers at Startup
Create a helper bootstrap class:
public static class HandlebarsHelperRegistration
{
    public static void RegisterAll()
    {
        Handlebars.RegisterHelper("toUpper", ...);
        Handlebars.RegisterHelper("ifEquals", ...);
        Handlebars.RegisterHelper("formatDate", ...);
    }
}
Then call it once during startup or email service setup:
HandlebarsHelperRegistration.RegisterAll();✅ Summary
Handlebars + ASP.NET is a clean, maintainable, and powerful way to render HTML emails.
🔹 Works great for onboarding, password resets, invoices, and marketing
🔹 Supports reusable templates and custom logic
🔹 Keeps your C# code clean and your templates readable
📁 GitHub Example
👉 Full working code available at:
🔗 https://sourcecode.kanaiyakatarmal.com/Handlebars
I hope you found this guide helpful and informative.
Thanks for reading!
If you enjoyed this article, feel free to share it and follow me for more practical, developer-friendly content like this.